Wednesday, September 10, 2014

SHOW US YOUR STUFF - September

A beautiful Spring Mood Board at SUYS this month... check it out.... HERE....


We would love you to join us for a chance at some great prizes!

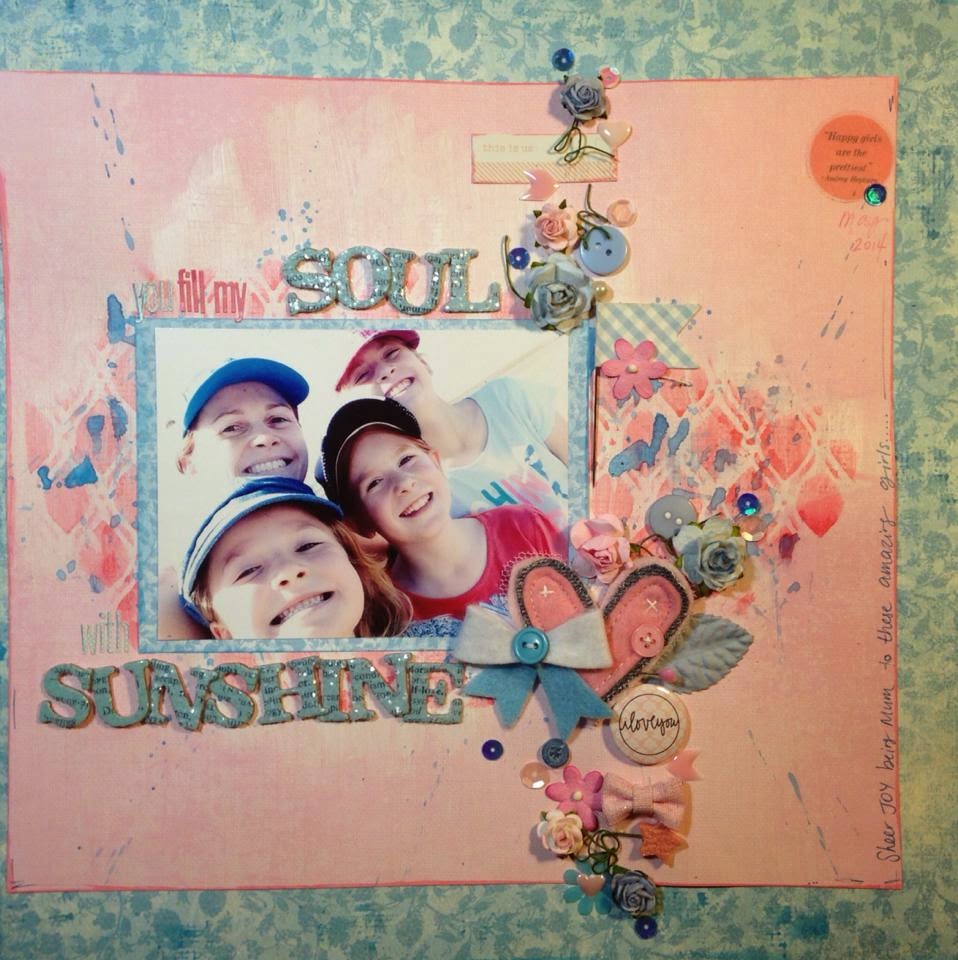
I picked up the pinks and the flowers and came up with this....

Patterned paper, plus some mists and gelatos.
HANDMADE items: Rainbow Splendour blue bow, Charms Creations Heart, DLish flair and fabric flag.....


Thanks for looking! :)

Amanda

Thursday, August 28, 2014

Rainbow Splendour and Flourish With a Bling! = Product Swap!

Hi everyone! Amanda here and today it is my turn to share my projects using the wonderful, the awesome, and the perfectly matched RAINBOW SPLENDOUR and FLOURISH WITH A BLING!

Checkout the full range of FWAB here: Flourish with a Bling


And you don't want to miss our RAINBOW SPLENDOUR SALE. LOTS of amazing Rainbow Splendour goodness coming your way! I love some of our favourite RS products made with a twist - you will love them too! But it's all very hush hush until the 28th of August!

Anyway, let's get sharing.....

I created this layout: "Out to Sea"

I created this layout with white cardstock, creating the background with gesso, gelatos and distress stains inks. A few bits of paper, doilies and washi on the background are then finished with lovely RS and FWAB products.


 I have used the FWAB "Jasmine Laser Flourish" (cut in half to stretch behind the photo), and then 
layered with Rainbow Splendour Felt layered flowers and glitter foam leaves.

And layouts can always be FINISHED with FWAB "Adhesive Rhinestones" - love scatters of bling, as well as for flower centres!
 
Find them here:


Next, I created this card: "Thank you"...
which was given to some lovely teachers at my children's school the day I made it! Now it is proudly displayed on the office window!

I again used white cardstock and some inking and stamping, before layering patterned paper. FWAB and RS team up for awesome finishes to any card!

To create the cluster I used the FWAB Flowers, with FWAB Chloe Pearl flourish,
RS felt hearts, as well as a button and some paper roses.
 
Find them here:


Thanks so very much for supporting FWAB and RS this month!
 
Amanda


Monday, August 18, 2014

New fabric Bows at Rainbow Splendour

Squeals of excitement this month for us, when we saw the new Rainbow Splendour Fabric Bows that Chloe has made for us. There are a few different colour combos and they are pretty fab and will be available in this months sale!

Here is a page I created with one of the bows - front-row-centre-stage as the highlight of the page!

 
I created this page background with some gesso, then glued some random old acrylic letters down, then used gelatos + water to plastic bag stamp the background. Layered my photo, papers and embellishments on this. Love these primary colours!

Close up of the NEW fabric bow.
 
 
Thanks for looking!
 
Amanda


Wednesday, August 13, 2014

PINK! crazy!

Love pink/black/white together, so throwing this page together was easy!
 
Background with stickers and doodling ( and no mists/paints!)
 
 
And there is the beautiful Rainbow Splendour leaf - this one in glittery black and a layered felt heart.

 
What are you creating today?
 
Thanks for looking.
Amanda


Monday, August 11, 2014

SUYS August challenge

This month at SUYS, it's a shape challenge... which means you have to use AT LEAST ONE of the following shapes:

A square, rectangle, bunting, banner, circle and a splatter.
Plus: a handmade item.

Here is my layout:


Shapes: Square background, rectangle photo, hand-cut circles, bunting and banners all from the patterned paper and stamped splats (amongst other misting and stamping)!
 
Handmade items: Flutterby Designs Flair, and {scrAp this!} diecut arrow and heart.
 
 
One of my handmade items was a Flutterby Designs DIY flair. It is white and raw and means you can paint it to match your layout, as you can see above.


Hope you can join the challenge this month!

Amanda

Scrap the Girls AUGUST challenge

Have you seen the cool MOOD BOARD at Scrap the Girls this month?


Rikki Graziani's photo.


Here is my layout....


So I started with patterned paper and did a coat of gesso. Then stuck a heap of chipboard down and gesso'd again. Then went busy with mists and inks and stamping. Finally layered my embellishments and photo and title. I love Charm's Creations gold range, but it was white/cream at the bottom - so no worries - I just put it in the mists/ ink to change the colour and it worked perfectly!
 
The story behind the glasses..... at our recent inclusive Technology conference, we had Kevin Honeycutt - an amazing educator from the states. He had real google glasses which he let everyone try. But he told me that I had to wear these Steampunk google glasses that he had made. Fun fun!
 
 
Anyway, hope you join us at STG this month.
 
Amanda


Thursday, July 24, 2014

Scrap the girls - July challenge

Hi everyone.....

There is still time to create your layouts for STG this month! We would love to see your creations!

This month we want you to create a layout using PAINT and TEXTURE PASTE! How easy!

So here is a step by step for how I created my layout....


1. Started with plain piece of cardboard (that was a backing sheet to something I had bought!).

2. Got out my Gesso, ready to go!

3. Painted some Gesso on the background... random stripes up and down.

4. Next I got my texture paste and my metal spatula.

5. Using my Tim Holtz Masks, I put some splattering of texture paste on the layout. They are strategically placed based on my layout design (which I already have planned in my brain!). As you can see I didn't wash off some red mist from the mask and this kinda came through with the texture paste, but it doesn't matter!


6. Gold mist through the hearts masks on the whole layout. <3 <3 <3
Looked like this....

7. Got my Tim Holtz Distress stain ready...

8. And ran it over another mask in a few spots on the layout. The distress stain bleeds and is a bit messy, but that is all part of the effect!

9. Next, for extra effect, a few splatters of Dylusions mist. I unscrew the lid and flicked the ink from the end of the stick.

10. Using Mod Podge, I glued down some bits of tissue paper to the background.


11. Background now done and dried, I start layering the photo and embellishments. Strips of Washi tape, staples, vellum & paper die cuts, skeleton leaves all play a part in the layout.

12. Some clusters of flowers, leaves, sticker words and buttons. As well as some Freckled Fawn arrows, Glitz designs bling, and even a DIY Flutterby designs flair. Looks like I added some black stamping in there on the background too - musta forgotten to take a photo of that!


Ta da! Here's the final layout......


Please join the fun at STG this month!!!!

Thanks,
Amanda