Thursday, April 30, 2015

Rainbow Splendour Cork Polaroid and Leaves

Hi again,

Well..... I have been playing along with the challenges at the Scrap Suite this weekend. And combining my awesome Rainbow Splendour goodies with some D'lish Scraps beauties, is a recipe for success!!!!!

Here is the challenge:


And here is my page and some close ups:

I put a bowl on the page and painted and splattered around the bowl! So easy! Also machine stitched the circle.

Layered the Rainbow Splendour cork Polaroid under the corner of the photo with tags and journal stickers, plus added flowers and leaves on top.


Thanks for looking today,
Amanda

Wednesday, April 29, 2015

Rainbow Splendour Vellum Bow and Polaroid

Hi again,

Well..... I have been playing along with the challenges at the Scrap Suite this weekend. And combining my awesome Rainbow Splendour goodies with some D'lish Scraps beauties, is a recipe for success!!!!!

Here is the Colour challenge....


And here is my page and some close ups:


WOW... how cool does that polaroid and GOLD vellum bow look????? Especially with that gold Heidi Swapp sticker and grey felt flower from D'Lish?

More goodies! These from D'Lish!
 
 
Thanks for looking!
Amanda
 

Tuesday, April 28, 2015

Rainbow Splendour bow and bunny

Hi again,

Well..... I have been playing along with the challenges at the Scrap Suite this weekend. And combining my awesome Rainbow Splendour goodies with some D'lish Scraps beauties, is a recipe for success!!!!!

Here is the Sketch challenge....


And here is my page and some close ups:

ahhhhh..... my 3 beautiful girls on Easter morning.... xoxo

How perfect is that Bunny pin!!!!

And a felt bow, which looks super special with a LOVE paper clip on it!!!!
 
Such a cute layout!
 
Thanks for looking,
Amanda


Sunday, April 26, 2015

Scrapbooking top50 - April challenge

It has been ages since I have played with the challenges at Scrapbooking Top50, so had the chance to play this weekend. Here was the simple challenge, to use HAPPY on a layout,.


Here is my page and some close ups....
I started with white cardstock and put a plate on the page. Then used a paintbrush with my dylusions mist to paint the circle and also some flicks of paint. I also stitched the circle.

See the awesome Rainbow Splendour leaf?


And an amazing Charms Creations arrow?
 
Perfect colours right? I almost felt patriotic doing this page with the green and gold!
 
AND... did you notice I used some of the old BRADS from my stash that I PROMISED to use after my recent clean up of my scrap space.
 
Thanks for looking today! Be Happy!
Amanda


WHITE WITH 1 - April Challenge

Well, next month I join the Design team at White with 1 (oh lucky me!), so I thought I would have one last crack at this month's challenge. Last chance to be in the running for prizes - lol! Except, of course, I rarely enter these blog challenges for the winnings, it is always more about challenging yourself to do something different. White with 1 always pushes me to use a colour that I wouldn't naturally turn to. And April is just like that.... The challenge is:

ww1 sand

And here is my page:


So..... I found this piece of Lillibee Designs paper in my stash ----- perfect colour!!!! Used with gesso through a heart stencil. Then I used my white posca pen to doodle the hearts to give them definition.
I layered the photo with cardstock and vellum, and machine stitching.


And how perfect is the colour of the CHARMS CREATION for this challenge!
A few flowers, buttons, word stickers and the page is done!
 
Thanks for looking, hope you are inspired to join in on the challenge at White with 1 this month!
 
Amanda


Saturday, April 25, 2015

Charms Creations Inspiration Challenge

Love being a part of the Charms Creations DT....

It is so easy to be inspired when you have these..........


(which you can go and BUY right now from here) .....


plus the mid-month challenge board.....


So here is my page and some close ups:

I stitched this old piece of Prima Butterfly paper to a Kraft background, and then brought elements of kraft back into the top layers and embellishments. I also layered muslin, transparency, doily and vellum under the photo.


The NEW Charms butterfly heart, looks perfect nestled amongst teal, cream and white flowers and embellishments.


Such a rare photo of my oldest 2 girls, actually looking happy together! So often they seem to be fighting, I so hope they learn to really cherish each other and their special sister bond.

 
Thanks for stopping by today,
Hope you are getting some scrapping done where you are....
 
 
Amanda


Tuesday, April 21, 2015

Gold vellum bow from Rainbow Splendour

 
I have been playing with the challenges over at The Scrap Suite  - and I started this weekend and here is the page I created.... Once I started working with the touches of gold, of course the GOLD VELLUM BOW from Rainbow Splendour was a MUST!


The challenge also asked to create your own embellishment - I made these twirly twine flowers. Used a gold/neutral twine - twirled it around and put metallic gold thread under it. I think they look cute!
 
Thanks for looking today. Have you got some vellum bows to play with - SHARE them with us!!!!

Amanda


Monday, April 20, 2015

Altered Charms Creations

Hi everyone,

Charmane recently made us some of these....

Canvas hearts - we decided, given they were made of canvas, that they would be awesome to alter with mists and inks.

So I had a play and here's what it looked like....
Please note: these photos are when the mist was still a little wet, so the colour is brighter. They took a long time to dry so I used my heat gun.

As I was creating my background, using water and dylusions spray, I put the heart upside down into some of the excess colour on the layout and allowed it to soak into the material. I dripped a few spots of black mist onto it as well.

I also tried using ink and a stamp to lightly stamp on the canvas, although it was hard to see. I used my black posca pen to doodle the black heart on the front. I didn't end up using the heart like this, but I do like the effect and think it would great on a grungy kinda page!

Not totally happy with the heart for this layout, I flipped it upside down, and well....
 I liked it like that!!!! ;)


So..... here is my final layout, and a close up......


You can see that the colours of the Charms upside down were much better suited to the soft colours in the layout.


We would love to see how you alter a Charms Creation - just makes these little beauties SO much more versatile! Have a play like I did and see what you come up with!

Thanks for looking today,
Amanda


Thursday, April 16, 2015

My Scrapbook Space 2015


Last weekend, I decided to spend some time tidying up my scrap space.... I have LOTS of well organised spots, but it needed a clean and overhaul.


BEFORE:

Here are some before photos... some MESSY spots, including huge big piles of layouts awaiting action! As you can see from this photos, my scrap space is a shared zone. It is in a central area of our house that would have been the dining room.

:
I have a huge IKEA EXPEDIT bookshelf- housing albums & kids books, which is a room divider to create this space.
 
My office with computers and paperwork on one side of the room and .....

my scrap space on the other.


AFTER:

Now here are the AFTER PHOTOS, and I will show you how I organise my supplies. I like to be organised - I am certain it makes me scrap more efficiently!

Ah... that's better - tidy and clean!
 
 
ON MY DESK:
 I have the white Ikea Ribba shelves over my desk - the top shelf for layouts on display
and the bottom shelf for all my mists and distress stains.
I recently got the mini-cube units that are on either side of the desk - I got them from "Masters" hardware store and they are perfect!!!


Shelves over desk showing my growing collecting of mists and distress stains...


This right side cube shelf holds various things including pens, embossing supplies, as well as some small stacked containers with little embellishments like: small chipboard, charms, glitter, beads, etc.


This left side cube shelf holds my 6X6 paper pads (need a bigger better box for this!), my favourite wooden and acrylic stamps, as well as my Canon Selphy photo printer.
 

This is "Bob", he clips on the front of my desk. It's my rubbish bin, plus I put my glues in the holder. Old teatowel handy for messy stuff!
 
 
Common tools and bits go into this simple pen holder that I got from Kmart. I put it on a plastic lazy susan, as it is way easier to access the stuff when I can spin it around. My tapes hooked on top and heat gun right there, ready to go!

 
These embellishment boxes sit in the middle of my desk and are well used! And some of my favourite bits go in the boxes on the right - my Rainbow Splendour and Charm Creations goodies!
 
So these embellishment boxes are my MOST favourite thing.... I have colour sorted all my little embellishments and they go in these boxes...
 

Here is an example of what they look like inside. CRAMMED full of good stuff! It might not look organised, but I have a general system for where I put small flowers, cool embellishments, small tags & diecuts, buttons and flairs.
 
Colour sorted washi tape goes in these stackable baskets.
 
 
UNDER MY DESK:
 
Under my desk, on either side, are these white IKEA Antonius drawers.
Right side drawers.... and here is what is in each drawer......
 
Right side - drawer 1 - Small stickers, brads, enamel dots, tags, polaroids and other embellishments - stored in small boxes, stacked and easy to access.
 
Right side - drawer 2 - These are my colour packs. Again colour sorted embellishments in these pencil cases. These contain tags, diecuts, doilies and all sorts of flat-ish stuff. 

Right side - drawer 3 - These old trusty containers that hold my colour-sorted small embellishments. In here you find my sequins (can you guess - yup - they are colour sorted), as well as all those brads & eyelets that I still have in my stash from when I first started to scrap.
{note to self: scrap a layout with some little brads and eyelets}

Right side - drawer 4  - Ribbons - Different coloured ribbons are in snap lock bags. Again it looks messy, but because things are colour sorted, it is pretty easy to find what I need.
 
 
 Left side drawers.... and here is what is in each drawer......
 
Left side - drawer 1 - I have my BIG flowers colour-sorted into snap lock bags. Fabric, doilies and tissue paper stored down the back.

Left side -drawer 2 - I have two boxes in here; the front box has colour-sorted alphabet stickers and the back box has all my cool stickers.

Left side - drawer 3 - Here are some of my Thicker Alphas, and in the boxes at the back are other snap lock bags of alphabets (think: chipboard, acrylic, canvas, etc. etc.).
The pink folder at the back has my mini-alphabets.

Left side - drawer 4 - And more Thicker Alphas. And chipboard alphas along the side.
 
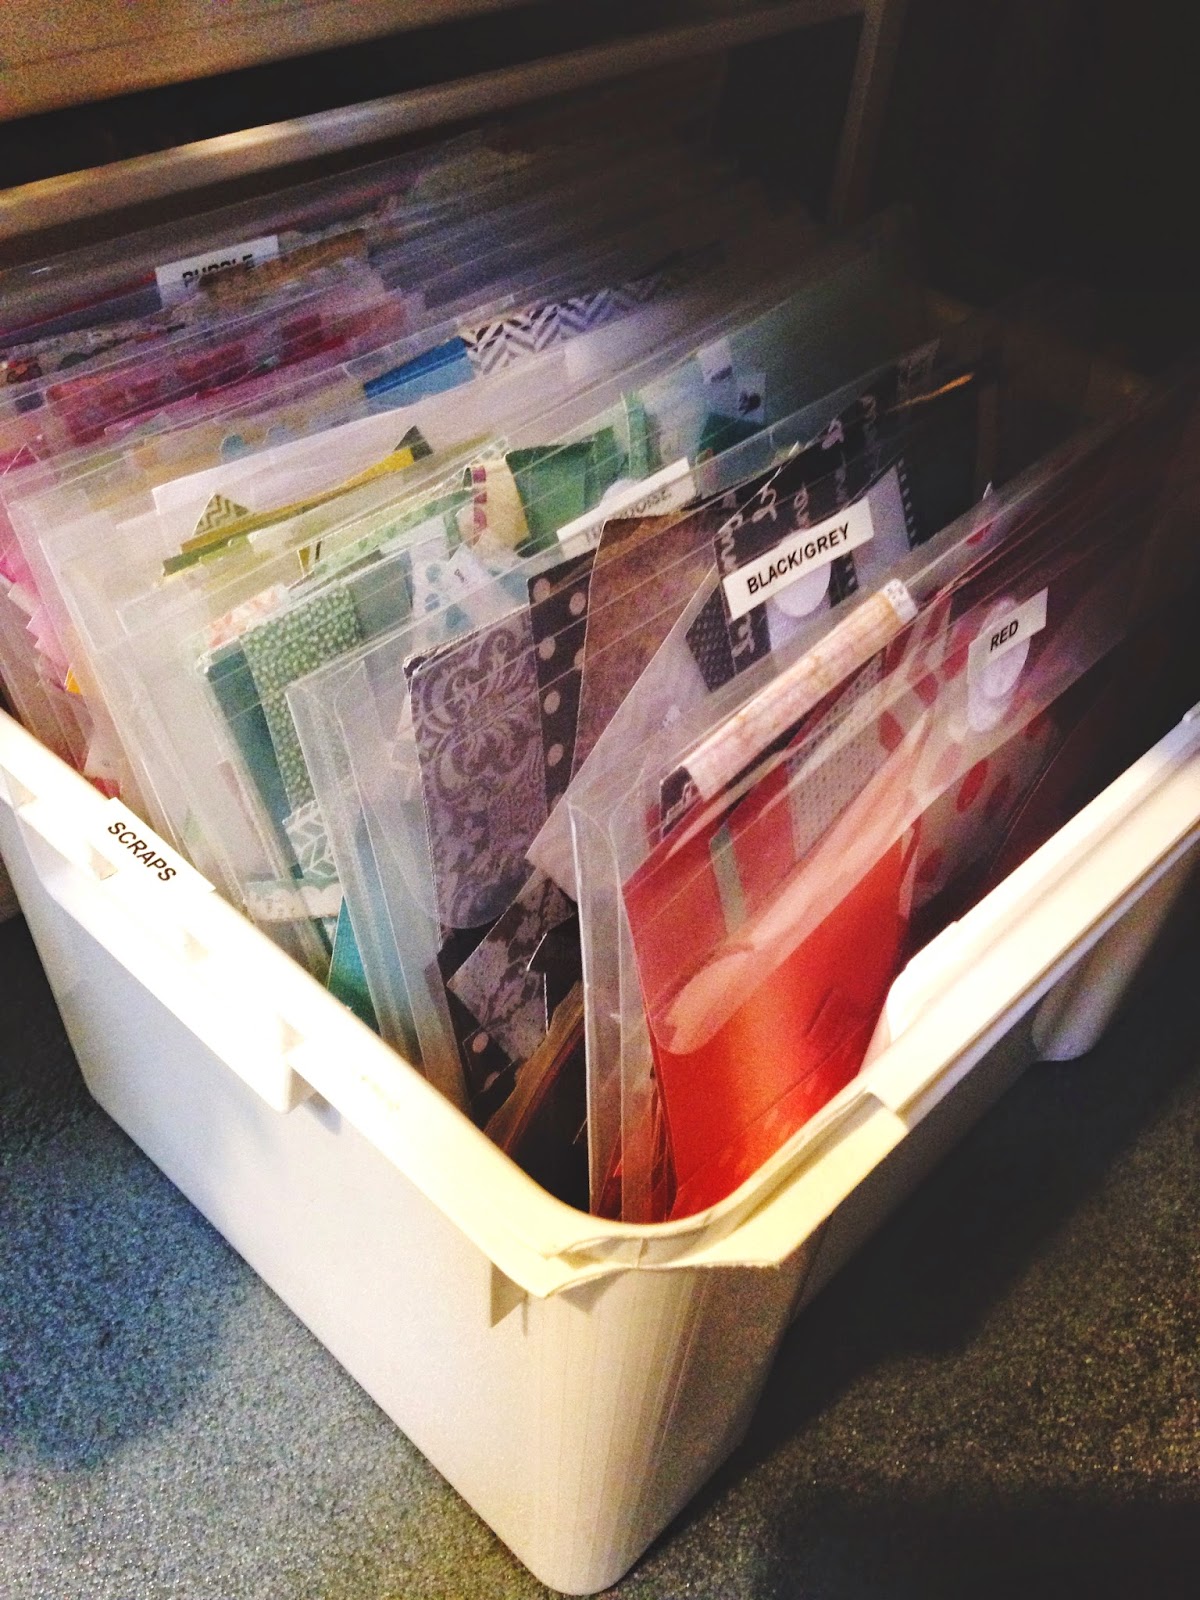
My paper scraps sit in this box at my feet... all in folders for each colour.
 
TO THE LEFT OF MY DESK:
 
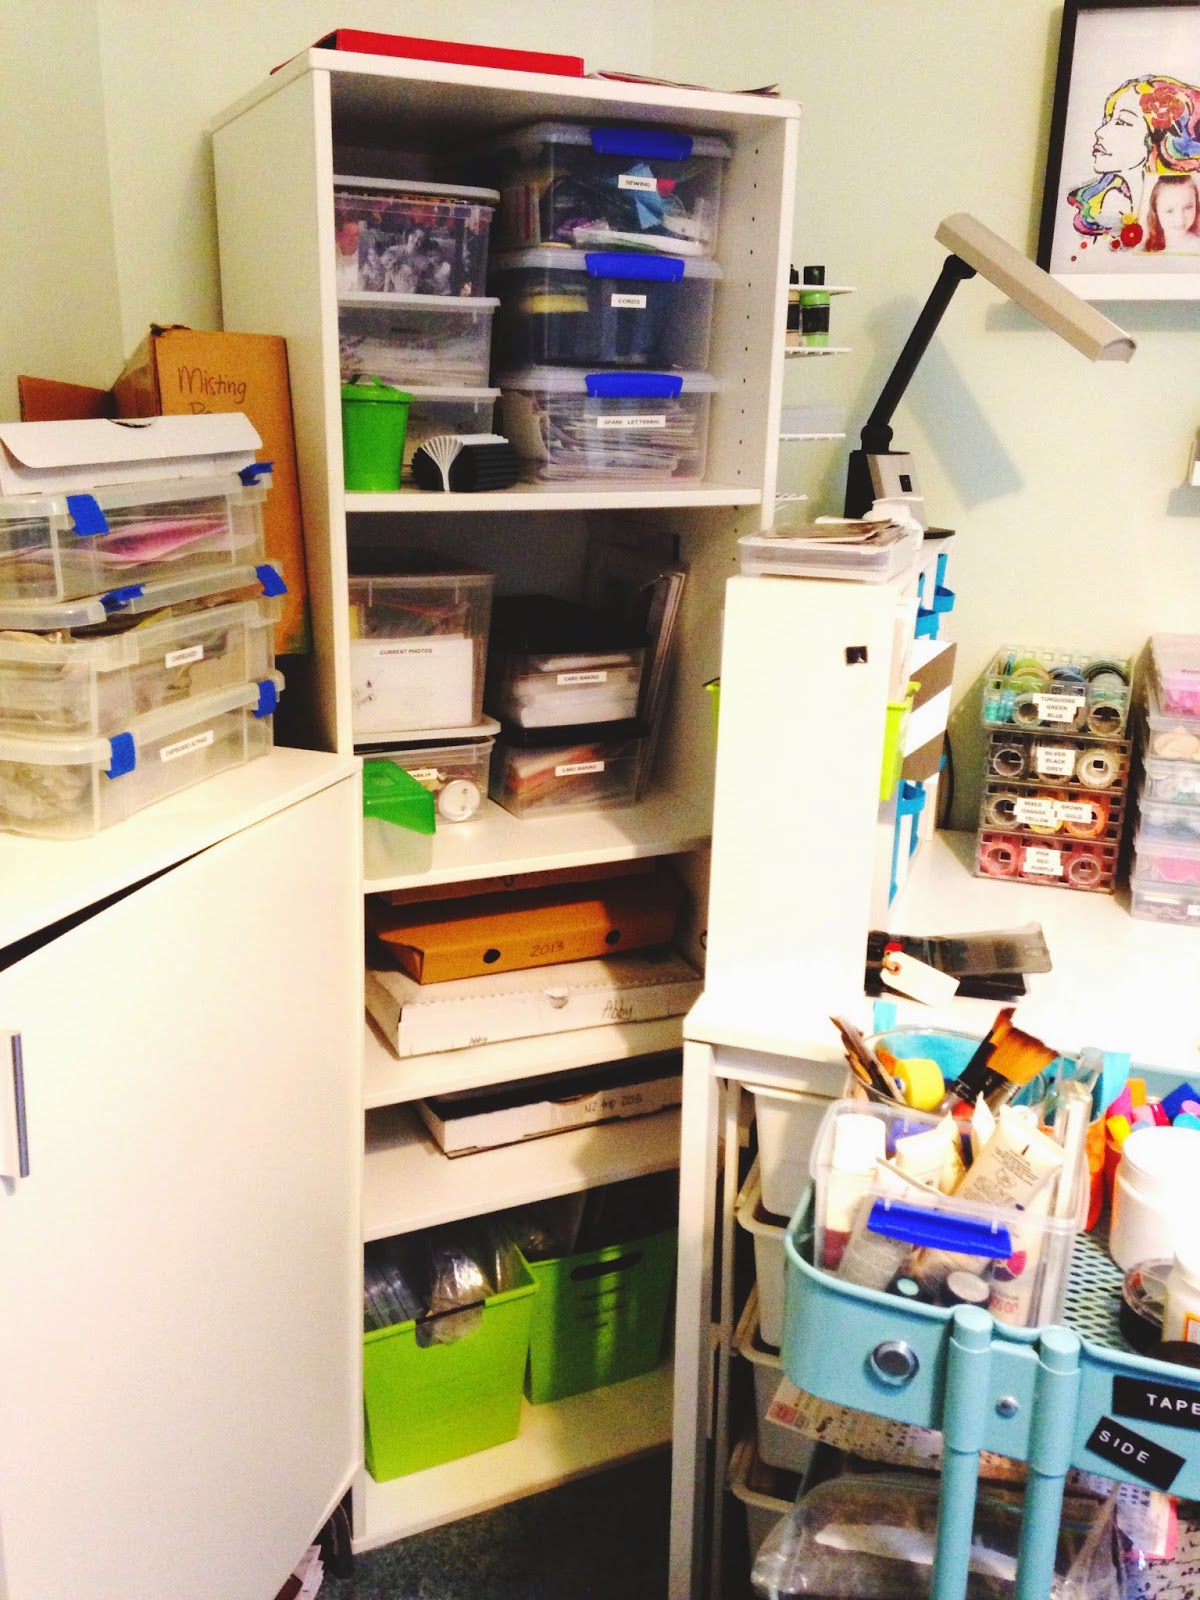
This corner unit holds a whole heap of miscellaneous stuff. EG> photos, card making stuff, memorabilia, sewing kit, layouts, etc. etc.
 
This white unit has papers and extra stamps. On top used to hold all those completed layouts - but now looks blank and empty and ready to be messed up! The 12X12 plastic boxes has current layouts, and chipboard shapes and alphas. Pizza box with my latest APOCD kit! The shelf above has blue baskets - these hold my punches and spare adhesive and tools. My spare paints and inks are also up there.

These drawer units from Kmart hold all my patterned papers which I have organised by, you know.... colour....!!!
 
I love my Ikea Raskog trolley, which I wheel around to where I need it. Up top are some of my paints, gelatos and paint tools. In the middle are all my masks. Down the bottom is my "dump" spot - the place where I dump scraps and bits I didn't use - helps me to tidy my space quickly.
 
 
This is where I put those finished layouts ... up the top of the shelf, organised in pizza boxes - patiently awaiting to go into albums - like the hundreds of pages before them!


So all is tidy and perfect here.... best I go and create something!

 
Thanks for looking today!
 
Amanda